1.Server IP address is 192.168.0.254 and machine name is SERVER1.
2.Windows machine IP address is 192.168.0.2 and machine name is client2.
3.Firewall Should be disabled.
#chkconfig iptables off
#service iptables stop
#chkconfig ip6tables off
#service ip6tables stop
4.To check if all rpms required for samba are installed or not.
#rpm –qa | grep samba
Samba-<version-name>
Samba-common-<version-name>
Samba-client-<version- name>
System-config-samba-<version-name>
5.If not, install it using
#rpm –ivh samba
6.Copy the original configuration file as smb.conf.bck
#cp /etc/samba/smb.conf /etc/samba.conf.bck
(This will keep a backup copy of your configuration file.)
7.Now edit the configuration file
#vi /etc/samba/smb.conf
8.To share home directory edit this part of /etc/samba/smb.conf
[homes]
comment=Home directories
browseable =no
writable=yes
9.To share printer edit this part of /etc/samba/smb.conf
[printers]
comment = All printers
path = /var/spool/samba
browseable = no
10.To configure share called IHNCSHARE edit this part of /etc/samba/smb.conf
[IHNC’s share]
comment = Testing Samba Server
path = /samba
valid users = user1, user2
11.Save the file with wq:
12.To check your configuration file type testparm
#testparm
13.Create two samba users user1 and user2
useradd user1
useradd user2
14.Create smbpassword for both the users
smbpasswd –a user1
smbpasswd –a user2
15.Now you stop/start the samba services
#service smb stop
#service smb start
16.To see what is shared from your server through samba for a particular user
#smbclient -L server1 –U user1 or smbclient –L //192.168.0.1 –U user1
17.To see what is shared for a particular host
#smbclient –L mac2
18.Now, permanently make samba server on
#chkconfig smb on
Accessing Windows Shares from RHEL 6
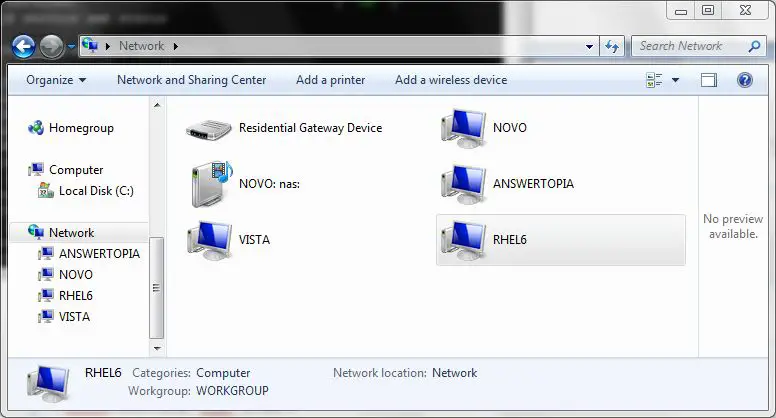
Now that the Samba resources are configured and the services are running, it is time to access the shared resource from a Windows system. On a suitable Windows system on the same workgroup as the RHEL 6 system, open Windows Explorer and navigate to the Network page. At this point, explorer should search the network and list any systems using the SMB protocol that it finds. The following figure illustrates an RHEL 6 system named rhel6 located using Windows Explorer on a Windows 7 system
Double clicking on the RHEL 6 host will prompt for the name and password of a user with access privileges. In this case it is the demo account that we configured using the smbpasswd tool. Entering the username and password will result in the shared resources configured for that user appearing the explorer window, including the tmp resource previously configured:
Double clicking on the tmp shred resource will display a listing of the files and directories contained therein.
Accessing Windows Shares from RHEL 6
As previously mentioned, Samba is a two way street, allowing not only Windows systems to access files and printers hosted on an RHEL 6 system, but also allowing the RHEL system to access shared resources on Windows systems. This is achieved using the samba-client package which is installed by default under most RHEL 6 configurations. If it is not currently installed, install it from a Terminal window as follows:
su –
yum install samba-client
To access any shared resources on a Windows system, begin by selecting the Places -> Network desktop menu option. This will display the Network browser dialog including an icon for theWindows Network (if one is detected) as illustrated in the following figure:
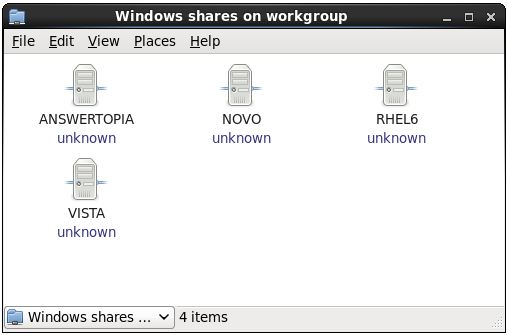
To obtain a list of Windows workgroups on the network, double click on the Windows Network icon. From within the list of workgroups double click on the desired group to obtain a listing of servers available for access:
Finally, double clicking on a computer will list the shared resources available for access from the RHEL client.
Summary
In this chapter we have looked at the steps necessary to configure an RHEL 6 system to act as both a Samba client and server allowing the sharing of resources with other systems on a Windows based network. In the case of Samba server configuration in particular we have only scratched the surface of the configuration options available. A full over of Samba would require an entire book. Many such publications and online resources are available if you would like to learn more. Another good place to start is to type man samba in a terminal window.