Solve you all Technical problems related to Server, Router, Switches, Operating System, windows, Linux, CCTV Camera, Data Recovery etc. all through with Chat Room! with Chat Now and also Get latest News related to Technology
Touch with us for Information Technology Solutions. Email us for your Query on Technical.gaurav@gmail.com.
Today I am Sharing How To Run Whatsapp In PC their are may ways to run Whatsapp In PC and their are mayapplication to run Whatsapp In PC but we came simple method to run whats App in your PC . Whatsapp is one of the famous messengers in android for Smart Phone and you can also see Safe Your Android Gadgets With Best Antivirus.
Whatsapp Messenger is currently available for almost all leading SmartPhone Operating Systems like Android, iOS, Windows, Blackberry.when you Installing Whatsapp In Your PC You Can Get complete access and send messages to our friends from your PC.
Do You Want Install Whatsapp In Your PC You Can follow Some step:
Interested in Android? You don’t have to buy a device or go to a physical electronics store (do those still exist?) to try it out. You can run individual Android apps and play with the latest versions of the Android operating system on Windows. These are Android emulators for PCs.
Whether you want to try Android before you buy, experiment with the latest version of Android or sync apps between your Android device and your PC, these Windows programs have you covered.
BlueStacks doesn’t replicate the full Android experience, it’s just an “app player” that runs individual apps on your PC. BlueStacks starts in full-screen mode, but can also be used in windowed mode.
Install BlueStacks, search for an Android app, and you’ll be able to install it on your PC.
You’ll have to set up a Google account to download apps via Google Play, but you can always make a new Google account just for this purpose. BlueStacks also supports other app stores, including the Amazon Appstore for Android. Its built-in search feature searches for apps across all the app stores it supports.
If you have a Windows 8 touch PC, you can interact with Android apps like Modern apps and use BlueStacks to play Android games on Windows 8. Many apps use a swipe action — to perform a swipe, click and hold the mouse button down, move the mouse cursor, and then release.
BlueStacks also works with your Android phone or tablet if you already have one. You can install the BlueStacks Cloud Connect app, available in the Google Play, to synchronize apps between your device and your PC.
YouWave provides a free ten-day trial, which is more than enough time to get a feel for Android apps. Unlike BlueStacks, YouWave offers a full Android system with a home screen, app menu, and everything else.
This program depends on its own instance of VirtualBox, so you can’t use it if you have VirtualBox installed — you’ll have to uninstall VirtualBox first.
If you’d rather install Android in VirtualBox on your own, you can find instructions for doing soon the Android x86 page. It’s a bit more work, but it’s completely free with no time limits.
YouWave doesn’t include many apps, but you can install Google Play inside it to get more apps. Click the View menu, select Online Content, and click the Google Play icon to download it. Click the View menu again, select Apps, and click the Google Play app — Google Play will be installed.
You can launch Google Play within the Android emulator to browse and install Android apps. You’ll need a Google account, but you can always create a new one specifically for YouWave.
Google’s Android software development kit provides a free Android emulator, although it’s targeted at developers. You can run the latest version of Android with this method, so it’s a great way to try out the latest version of Android if you have a device that’s stuck on an older version.
First, you’ll need Java installed. You can then download the SDK Tools from Google. Click the Use an Existing IDE option on the page and download the SDK Tools package. After installing it, launch the SDK Manager and install the recommended files for the latest version of Android. Click the Install button and the SDK manager will automatically download and install the required software.
Click the Tools menu once the download has finished, select Manage AVDs and click the New button to create a new virtual device. Select a device — an older device like the Nexus S should be easier to emulate – and your installed version of Android. Name the virtual device and click OK to create it.
You’ll see your new virtual device in the virtual device manager window. Select it, click the Start button and click Launch to launch the Android emulator. It may take a while to start — perhaps over a minute, depending on your hardware.
Google’s Android emulator for PC definitely doesn’t perform as well as BlueStacks or YouWave. It also doesn’t have Google Play or any other app store integrated, but you candownload app files in APK form and install them.
Conclusion
Android’s openness allows developers to create applications like these, which is awesome — no similar solutions are available if you want to try out iPhone or iPod apps on Windows. Still, there are some limitations — performance isn’t as good as it is on real hardware, for one.
Remember that Android wasn’t designed for the mouse. Android devices support mice and keyboards, but they’re really designed for touch. It’s like using Modern Windows 8 apps with a mouse — Microsoft has said they’re “touch first” and they certainly feel like it.
However, you may even be able to install Android on an old netbook you have lying around — it’s worth a try if you aren’t getting much use out of that netbook anyway.
Have you tried running Android emulators for your PC? Which app worked best for you? Leave a comment and let us know!
1:- An internet connection has become a basic necessity in our modern lives. Wireless hot-spots (commonly known as Wi-Fi) can be found everywhere!
If you have a PC with a wireless network card, then you must have seen many networks around you. Sadly most of these networks are secured with a network security key.
Have you ever wanted to use one of these networks? You must have desperately wanted to check your mail when you shifted to your new house. The hardest time in your life is when your internet connection is down.
Cracking those Wi-Fi passwords is your answer to temporary internet access. This is a comprehensive guide which will teach even complete beginners how to crack WEP encrypted networks, easily.
Table of Contents
How are Wireless networks secured?
What you'll need
Setting up CommView for Wi-Fi
Selecting the target network and capturing packets
Waiting...
Now the interesting part... CRACKING!
Are you a visual learner?
How Are Wireless Networks Secured?
In a secured wireless connection, internet data is sent in the form of encrypted packets. These packets are encrypted with network security keys. If you somehow manage to get hold of the key for a particular wireless network you virtually have access to the wireless internet connection
Broadly speaking there are two main types of encryptions used:
WEP (Wired Equivalent Privacy):
This is the most basic form of encryption. This has become an unsafe option as it is vulnerable and can be cracked with relative ease. Although this is the case many people still use this encryption.
WPA (Wi-Fi Protected Access):
This is the more secure alternative. Efficient cracking of the passphrase of such a network requires the use of a wordlist with the common passwords. In other words you use the old fashioned method of trial and error to gain access. Variations include WPA-2 which is the most secure encryption alternative till date. Although this can also be cracked using a wordlist if the password is common, this is virtually uncrackable with a strong password. That is, unless the WPA PIN is still enabled (as is the default on many routers).
Hacking WEP passwords is relatively fast, so we'll focus on how to crack them for this guide. If the only networks around you use WPA passwords, you'll want to follow this guide on how to crack WPA WiFi passwords instead.
What You'll Need...
A compatible wireless adapter:
This is by far the biggest requirement.The wireless card of your computer has to be compatible with the software CommVIew. This ensures that the wireless card can go into monitor mode which is essential for capturing packets.Click here to check if your wireless card is compatible
CommView for Wi-Fi :
This software will be used to capture the packets from the desired network adapter.Click here and download the software from the website.
Aircrack-ng GUI:
After capturing the packets this software does the actual cracking.Click here-Click here and download the software from the website.
A little patience is vital!!
Step 1: Setting Up CommView for Wi-Fi
Download the zip file of CommView for Wi-Fi from the website. Extract the file and run setup.exe to install CommView for Wi-Fi. When CommView opens for the first time it has a driver installation guide. Follow the prompts to install the driver for your wireless card.
Run CommView for Wi-Fi.
Click the play icon on the top left of the application window.
Start scanning for wireless networks.
CommView now starts scanning for wireless networks channel by channel. After a few minutes you will have a long list of wireless networks with their security type and signal. Now it is time to choose your target network
Step 2: Selecting the Target Network and Capturing Packets
A few things to keep in mind before choosing the target wireless network
This tutorial is only for WEP encrypted networks.
So make sure you select a network with WEP next to its name
Choose a network with the highest signal.
Each network will have its details in the right column.
Make sure the WEP network you are choosing has the least the least dB (decibel) value.
Once you have chosen your target network,select it and click Capture to start capturing packets from the desired channel.
Now you might notice that packets are being captured from all the networks in the particular channel. To capture packets only from the desired network follow the given steps.
Right click the desired network and click on copy MAC Address.
Switch to the Rules tab on the top.
On the left hand side choose MAC Addresses
Enable MAC Address rules
For 'Action' select 'capture' and for 'Add record' select 'both'.
Now paste the mac address copied earlier in the box below.
We need to capture only data packets for cracking. Hence select D on the bar at the top of the window and deselect M (Management packets) and C (Control packets).
Now you have to save the packets so that they can be cracked later. To do this-
Go to the logging tab on top and enable auto saving.
Set Maximum Directory Size to 2000
Set Average Log File Size to 20.
Step 3: Waiting...
Now the boring part- WAITING!
NOTE: The amount of time taken to capture enough data packets depends on the signal and the networks usage. The minimum number of packets you should capture should be 100,000 for a decent signal.
After you think you have enough packets (at least 100,000 packets)
Go to the log tab and click on concatenate logs.
Select all the logs that have been saved.
Do not close CommView for Wi-Fi
Now navigate to the folder where the concatenated logs have been saved
Open the log file
Select File- Export -Wire shark tcpdump format and choose any suitable destination.
This will save the logs with a .cap extension to that location
Now the Interesting Part... CRACKING!
Download Aircrack-ng and extract the zip file.
Open the folder and navigate to 'bin'.
Run Aircrack-ng GUI
Choose WEP
Open your .cap file that you had saved earlier.
Click Launch.
In the command prompt type in the index number of your target wireless network.
Wait for a while .If everything goes fine the wireless key will be shown.
You may also receive a request to try with more packets. In this case wait until more packets have been captured and repeat the steps to be performed after capturing packets
BEST OF LUCK
Step 4: Are You a Visual Learner?
Just in case you didn't understand, you can watch this video walk-through.
Mac OS X v10.5 Leopard
Installation and Setup Guide
At the time of
writing this guide, OS X 10.5 Leopard was the current release by Apple. The
newest OS by Apple is OS X 10.7 Lion. The installation procedure should be
relatively the same as previous versions, although, you will need to first
create a Lion Recovery Disk using this tool provided
by Apple.
Install Mac OS X
v10.5 Leopard on a new hard drive.
Step 1 — v10.5 Leopard
·
Depending on the situation, there are two different methods to install
Mac OS X v10.5 Leopard on your hard drive:
oMethod 1: Install the operating system and software from scratch. If
this is your goal, continue on to step two.
oMethod 2: Clone your existing hard drive. If this is your goal, skip
to step 19.
Step 2
·Method 1: Fresh Install
·Insert a Mac OS X v10.5 Leopard installation disc into your optical
drive.
·Hold down the “option” key and restart the computer to bring up the boot
option menu.
·To begin the installation, click the install disc icon on the boot
option menu.
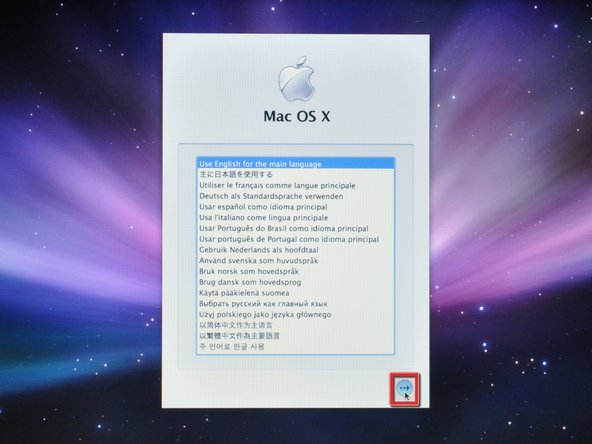
Step 3
·When prompted, select your language and click the arrow button to
continue.
Step 4
·After the installer loads, you will be greeted by a welcome window.
·Select “Disk Utility” from the Utilities drop down menu.
Step 5
·Select your new hard drive from the left column in Disk Utility.
·The correct partition type needs to be set for your hard drive.
oIf it's a brand-new hard drive, it may have no partition listed.
oFor an Intel-based machine, you should have "GUID Partition Table" listed.
oFor a Power-PC-based machine, you should have "Apple Partition Map" listed.
·If the incorrect partition type is listed, proceed to the next step to
delete and re-create the partition. If not, proceed to step 8.
·Warning: Deleting the partition will erase the entire contents of the
partition.
Step 6
·The following two steps are onlynecessary if your
drive's partition is set incorrectly. Erasing a partition will permanently
erase all information stored inside.
·Select the partition on the drive and click the "-" button.
·When prompted, click the "Remove" button to remove the drive's
existing partitions.
·Once the partitions have been removed, click the "Options..."
button.
Step 7
·Select the partition scheme required for your machine:
oSelect "GUID Partition Table" for Intel-based machines.
oSelect "Apple Partition Map" for PowerPC-based machines.
·Click "Ok."
·Press the "+" button to add a new partition.
·Press the "Apply" button.
Step 8
Click on the “Erase” tab.
Choose the Volume format (we recommend “Mac OS Extended (Journaled)”).
Step 9
Type in a name for the drive. Apple names their drives "Macintosh HD" from the factory.
Click “Erase.”
·
Step 10
A warning window will pop up and ask if you wish to continue with the erasing process.
Click "Erase" on the warning window that has popped up.
Step 11
After erasing is done, quit Disk Utility.
Step 12
After quitting Disk Utility, proceed with the installation by clicking the "Continue" button.
A window will open and ask if you agree to the Software License Agreement.
Agree to the Software License Agreement by clicking the "Agree" button
Step 13
Make sure the correct hard drive is selected as the installation destination.
Click "Continue" to proceed with the installation.
Step 14
We are now ready to install Mac OS X v10.5 Leopard on the hard drive. Before proceeding to the next step, make sure that all of the installation settings are correct.
Click "Install" to commence the installation.
Step 15
The installer will check the source DVD disk before starting the installation process.
During this step, you will see a "Skip" button in the Installer window. Do not click the Skip button if you haven't used your install disc before (or recently).
Step 16
Leopard will now install onto the hard drive.
The installation process can range anywhere from a half hour to an hour
Step 17
If you are installing Leopard from a retail disk, please skip this step.
If you are installing an OEM version of Leopard, you need to install the iLife applications and other software from the Applications Install Disc.
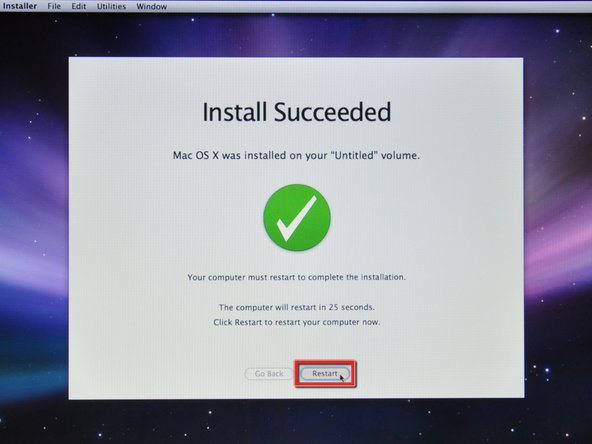
Step 18
The installation was successful. Click "Restart" to reboot the computer.
At this point you are finished with the Mac OS X install.
Step 19
Method 2: Cloning the existing hard drive.
The following instructions assume you will be using an external USB/FireWire enclosure for a laptop hard drive and SuperDuper! cloning software. If you’re using a different setup, your installation process may be somewhat different.
Install your new hard drive in the external USB/FireWire enclosure.
Connect the USB/FireWire enclosure to your Mac.
Step 20
Under the "Go" pulldown menu, select "Utilities."
Open "Disk Utility" from the "Utilities" window.
Step 21
Select your new hard drive from the left column in Disk Utility.
The correct partition type needs to be set for your new hard drive.
If it's a brand-new hard drive, it may have no partition listed.
For an Intel-based machine, you should have "GUID Partition Table" listed.
For a Power-PC-based machine, you should have "Apple Partition Map" listed.
If the incorrect partition type is listed, proceed to the next step to delete and re-create the partition. If not, proceed to step 24.
Warning: Deleting the partition will erase the entire contents of the partition. Make sure you have selected the new hard drive!
Step 22
The following two steps are only necessary if your drive's partition is set incorrectly. Erasing a partition will permanently erase all information stored inside.
Select the partition on the drive and click the "-" button.
When prompted, click the "Remove" button to remove the drive's existing partitions.
Once the partitions have been removed, click the "Options..." button.
Step 23
Select the partition scheme required for your machine:
Select "GUID Partition Table" for Intel-based machines.
Select "Apple Partition Map" for PowerPC-based machines.
Click "Ok."
Press the "+" button to add a new partition.
Press the "Apply" button.
Step 24
Click the “Erase” tab.
Choose the Volume format (we recommend “Mac OS Extended (Journaled)”)
Type in a name for the drive.
Step 25
There may be an option to "Install Mac OS 9 Drivers" under the Erase panel. We do not recommend installing these drivers unless the disk will be used in any environment other than Mac OS X.
Uncheck the "Install Mac OS 9 Disk Drivers" box.
Click “Erase.”
Step 26
A warning window will pop up and ask if you wish to continue with the erasing process.
Click "Erase" on the warning window that has popped up.
When you are asked if you want to use the new drive to backup data with time machine, click "Cancel."
After the drive has been erased, quit Disk Utility.
The new hard drive should now appear on your computer’s desktop.
Select your current hard drive in the dropdown menu labeled “Copy.”
Select your new hard drive in the dropdown menu labeled “to.”
Select “Backup – all files” in the dropdown menu labeled “using.”
Step 29
Click “Copy Now.”
If prompted, provide your password.
Click "Ok."
Step 30
Wait for the drive to copy (this could take several hours if you have a lot on your hard drive).
When prompted for registration by SuperDuper!, either choose "Register" to purchase the software or "Later" to register later.
Step 31
After the copy is complete, click "Ok" and quit SuperDuper!.
At this point, your new hard drive should be loaded with your existing software and ready to install; however, we recommend testing the software installation.
Step 32
Hold down the “option” key and restart the computer to bring up the boot option menu.
Step 33
Select your new hard drive from the boot option menu.
Wait for the computer to boot up and verify that you are actually booting up off the new drive. If you are in fact booting off the new drive, its icon will appear beneath the internal drive's icon on the desktop.
Your new hard drive is now ready to be installed in your computer.
Remove your new hard drive from the external enclosure and install it in your computer. Installation instructions are available for a variety of Macs.