Touch with us for Information Technology Solutions. Email us for your Query on Technical.gaurav@gmail.com.
Propellerads

27/03/2014

Driver For HP Pavillion 15-d009tu and 15-D010 tu Driver

Welcome to It Bull Experts .

Here are the drivers for Hp 15-d010tu and 15-d009tu laptop driver for window seven .

1: Chipset :-  Through this driver u can install usb 2.0 Driver and blue tooth driver . just Click on the link and download it .

2: Wifi Driver : - Download it for Wifi Driver .

3:- USB 3.0 Driver  :- Download Driver for USB 3.0 .

4: VGA Driver :-  Download VGA Driver Windows Seven Here .

Installing Windows Server 2012 (RC) Step-by-Step

How Install Windows 2012 Server RC .(Data Center )


You can then download the evalution copy of Windows Server 2012 from here, Download the ISO and burn it to some DVD:
http://technet.microsoft.com/en-US/evalcenter/hh670538.aspx?ocid=&wt.mc_id=TEC_108_1_33


A: : Minimum Requirement for Installing Windows 2012 RC Server .
Processor: Minimum: 1.4 GHz 64-bit processor
Ram: Minimum: 512 MB
Disk Space: Minimum: 32 GB
Other requirements:
  • DVD drive
  • Super VGA (800 x 600) or higher-resolution monitor
  • Keyboard and Microsoft® mouse (or other compatible pointing device)
  • Internet access


 Now that we have everything we need, We can Start:


1- Insert the Windows Server 2012 DVD, and once you get the following message press Enter to boot from the setup


2- Wait for a while till the setup loads all necessary files (Depending on your machine, it will take couple of minutes)


 3- Once the setup files are loaded, the setup will start with the following screen. You can change these to meet your needs (the default values should be fine for now)


4- Once you click Next, you can start the installation, click "Install now"


5- You will see the following screen, wait until it finishes loading


6- In the following setup screen, you will see four options. Select Windows Server 2012 DataCenter Evaluation (Server With GUI).


7- After you click Next from previous screen, Read the License terms, tick the "I accept the license terms" and click Next


8- Now It will ask you for the drive (or partition) you want to install Windows on. Here I'm installing it on the one partition I have here. NOTE: This will remove the content of the partition. Either you create a partition to install windows on, or you can test this on a testing machine


9- Now once we picked our partition, clicking on next from previous screen will start the setup. This process might take a while.


10- Once the setup is done, it will restart and start your Windows Server 2012 for the first time. It will ask you then to set up a password for the Administrator user


11- The setup will finalize your settings, might take a couple of minutes

12- Once the setup is done, you can log in for the first time to your Windows Server, as the screen says, press Ctrl+Alt+Delete to log in, and use the password you set in the setup process


13 - Once you Log in, Windows Server 2012 will show the Server Manager


Congratulations! you have now Windows Server 2012 Installed with Data Center.

26/03/2014

Adding Ram in HP Pavillion D Series Laptop ( D009 , D010 , D002tx, D005tu , D004 tu , D008 tu ) .

Dear friends 

If you want to add Extra Ram in HP Pavillion Dseries Laptop , then u have to add any of 1600 Mhz Ram with 1.3 v Ram  to your laptop just like 

1:- Crucial 4GB DDR3 1600Mhz (1 x 4GB) 1.35V SO DIMM Laptop RAM

2: Kingston 8GB KVR16LS11/8 1600MHz Low voltage DDR3 Non-ECC CL11 SODIMM (1.3v)

3: Adata

Adata Ram Will surly work with 1600Mhz (1.3v) (Model Num :- (adata ddr3l AM1l16bc4r1-b1gs 4GB ))


Hp Pavillion 15-D009 , 15-D008 tu , 15-d010  laptop has single Ram Slot . 
So Please Remove first one and add another .


Support's

Hp Pavillion D010 Tu 
HP Pavillion D009 Tu 
HP Pavillion D006 Tu 
HP Pavillion d004  Tu 
HP Pavillion D005 Tu 
HP Pavillion d002  Tx 


How to install windows XP in vmware work Station

How to  install windows XP in vmware work Station 

1: Download Windows XP in ISO Format :- click the link anbd download windows xp professional sp2 .

2: Download VM Ware 10 Work Station . :- This link is a torrent link , Click it and download with u torrent .

3: U Torrent  :- Download u torrent here .

Dear Friends Here i am showing how to install windows xp in Virtual Machine through VMware.

Just do Step by Step and install it .

These Days new laptop's and Desktop are not compatible with Windows XP OS , and of course   Microsoft said BY BY to windows xp , and still some software in market can't work in latest  Operating System . So make work them in latest operating system you have to install virtual machine through VMWare.

Installing XP on Virtual machine .


Click on file MENU 
 Then click New 
  After that Virtual Machine  
vmware pc install winxp 1
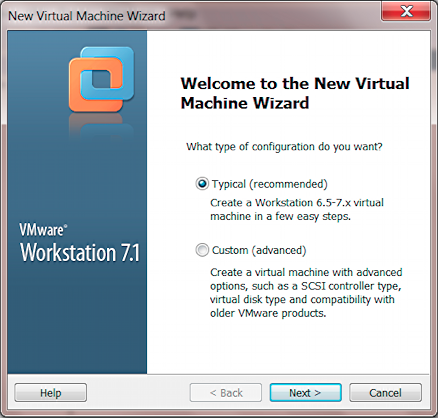
As you can see, the path I needed was File -> New -> Virtual Machine… which led me here:
vmware pc install winxp 2
That certainly looks easy and reassuring, which is good. It’s a complicated process, so grab a cup of tea or glass of water before we go further.
Ready? Insert your old Windows XP installation disk into the computer’s optical drive and unearth your license code (probably on a piece of paper in the WinXP box), you’ll need it too.
Choose “Typical” and click on “Next”…
vmware pc install winxp 3
Don’t have an install disk? That complicates things. Try to borrow one or go onto eBay or similar to find an old, cheap OS disk someone’s not using any more. There are no legal places you can download a disk image that I’m aware of, so I’m not sure about the “.iso” option.
We’ll proceed on the assumption that you have a real, legal copy of WinXP, so “Installer disc” is your choice. Click “Next” again…
vmware pc install winxp 4
VMWare Workstation can actually enter the product key for you when it gets to that point in the installation, which is terrific. At this point simply enter the code from your Microsoft product — carefully! — and give yourself a default account name and password, then, again, click “Next”.
vmware pc install winxp 5
I’d keep the defaults, though you can rename the virtual machine if you want. Not a big deal. Ready? Click on, well, you know the drill…
vmware pc install winxp 6
This step is one that’s hard to fix later, so I’d encourage you to think through if you need lots of space because you’re really going to do a lot of work in the virtual machine or not. If not, you can reduce the size of the virtual disk that VMware will use.
Continuing….
vmware pc install winxp 7
That all looks good. Click on “Finish” and VMware Workstation will start chugging away.
Oh, no it won’t! First thing it shows you are the external peripherals on the computer, reminding you that any or all of them can be automatically connected to the virtual machine on boot if desired. It’s really just an information dialog:
vmware pc install winxp 8
I’ll figure all that out down the road. For now, I’ll click “OK” and proceed with the installation of Windows XP on my virtual machine.
vmware pc install winxp 9
Tell me that’s not cool. The blue installation screen shows up — and proceeds through all the installation steps — within the VMware Workstation window. Sweet.
And proceed it’ll do. It’s quite a long process to fully install Windows XP…
vmware pc install winxp 10
And a while later…
vmware pc install winxp 11
Eventually it finishes the installation and restarts. This doesn’t mean anything at all happens on the Windows 7 level, it’s all safely trapped within VMware Workstation! Amazing:
vmware pc install winxp 12
Do you remember these screens as we’re going along?
vmware pc install winxp 13
Finally Windows XP is completely installed. Excellent. One more step is required, though, for VMware Workstation to install its own helper utilities to optimize the performance of XP within the virtual world. This happens automatically…
vmware pc install winxp 14
When it’s done, you’ve got a full and complete version of Windows XP running within the virtual workstation world, ready for you to insert CDROMs and install new software, download apps that are WinXP compatible, and more:
vmware pc install winxp 15


Now install what you want to install for windows XP .
It automatically accepts internet .


What Intel VT Virtualization Technology ?


What is intel VT Virtualization Technology ?


Intel Virtualization Technology (Intel VT) is a set of 
hardware enhancements to Intel server and client platforms that provide software-based virtualization solutions. Intel VT allows a platform to run multiple operating systems and applications in independent partitions, allowing one computer system can function as multiple virtual systems.

Intel® High End Desktop ProcessorsYesYes
4th Generation Intel® Core™ i7 Extreme ProcessorYesYes
4th Generation Intel® Core™ i7 ProcessorsYesYes
4th Generation Intel® Core™ i5 ProcessorsYesVaries By Product

What is Hyper Threading Technology ? HT


What is Hyper Threading HT ?.


Hyper-Threading is a technology used by some Intel microprocessor s that allows a single microprocessor to act like two separate processors to the operating system and the application program s that use it. It is a feature of Intel's IA-32 processor architecture.
Computer Service center panipat

With Hyper-Threading, a microprocessor's "core" processor can execute two (rather than one) concurrent streams (or thread s) of instructions sent by the operating system. Having two streams of execution units to work on allows more work to be done by the processor during each clock cycle . To the operating system, the Hyper-Threading microprocessor appears to be two separate processors. Because most of today's operating systems (such as Windows and Linux) are capable of dividing their work load among multiple processors (this is called symmetric multiprocessing or SMP ), the operating system simply acts as though the Hyper-Threading processor is a pool of two processors.

What is Intel Turbo boost Technology ?

What is turbo Boost Technology ?

Intel® Turbo Boost Technology 2.01 automatically allows processor cores to run faster than the rated operating frequency if they’re operating below power, current, and temperature specification limits.
Intel Turbo Boost Technology 2.0 is activated when the Operating System (OS) requests a frequency higher than the rated frequency of the processor.  Whether the processor enters into and the amount of time the processor spends in the Intel Turbo Boost Technology 2.0 state depends on the workload and operating environment.
Maximum turbo frequency indicates the highest possible frequency achievable when conditions allow the processor to enter turbo mode. Intel Turbo Boost Technology frequency varies depending on workload, hardware, software and overall system configuration.
Due to varying power characteristics, some parts with Intel Turbo Boost Technology 2.0 may not achieve maximum turbo frequencies when running heavy workloads and using multiple cores concurrently.
Availability and frequency upside of Intel Turbo Boost Technology 2.0 state depends upon a number of factors including, but not limited to the following:
  • Type of workload
  • Number of active cores
  • Estimated current consumption
  • Estimated power consumption
  • Processor temperature
When the processor is operating below these limits and the user's workload demands additional performance, the processor frequency will dynamically increase until the upper limit of frequency is reached. Intel Turbo Boost Technology 2.0 has multiple algorithms operating in parallel to manage current, power, and temperature to maximize frequency and energy efficiency. Note: Intel Turbo Boost Technology 2.0 allows the processor to operate at a power level that is higher than its TDP configuration and data sheet specified power for short durations to maximize performance.
Computer Service center panipat

What is Clock Speed?

Question :- What is clock Speed ?


Ans:- Clock speed is a measure of how quickly a computer completes basic computations and operations. It is measured as a frequency in hertz (Hz), and most commonly refers to the speed of the computer's Central Processing Unit (CPU). While computer developers and users can refer to this term regarding CPU performance, this has fallen out of favor as CPUs have become more complex. The easiest ways to boost clock speed in a computer include upgrading components and "overclocking" a piece of hardware.


Question :- What Clock Speeds Measure ?

Ans:- There is a small quartz crystal inside of a CPU that vibrates at a particular oscillation or frequency. This frequency sets the "speed" of processes in the computer and is usually very high; they are typically measured in megahertz (MHz) and gigahertz (GHz). A megahertz is one-million cycles per second, while a gigahertz is one-billion cycles per second. So a computer with a clock speed of 800 MHz is running 800,000,000 cycles per second, while a 2.4 GHz computer is running 2,400,000,000 cycles per second.
These cycles set the speed for all processes within a computer. This ensures that all components and memory are working together at a rate that remains harmonious. Different components and processes can also run as a fraction of the primary CPU speed, which allows each element of a computer to work on its own and still function with the primary frequency of the CPU .

Question :- How to Improving CPU Performance

Ans :- There are a number of ways in which a computer user can increase the speed of his or her computer. Upgrading an older CPU to a new one, for example, can provide hardware with a higher clock speed or multiple "cores." Multi-core processors are essentially two or more CPUs in one, which offer greater performance for software programs that can take advantage of multiple cores.
It is also possible to "overclock" a processor. This basically increases the clock speed of a CPU beyond what is recommended by the manufacturer, allowing the computer to run faster. Overclocking a CPU is not generally recommended, however, as it produces additional heat that can damage the processor or other components and typically voids most computer's warranties.


12/03/2014

Difference Between Fat and NTFS . NTFS or FAT

NTFS or FAT

You will almost always get the same answer: Go for NTFS! It has better security! Better this! Better that!
Folks, I’m here to tell you that that isn’t always the case, nothing is that clear cut (Life is never clear cut, rule no.1) and that the best solution is to have both file systems.

Well, Which One Should I Choose?

I can’t choose for you. I don’t know your situation, nor know your needs, you environment and so on. The choice to go for either FAT or NTFS will entirely hinge on how you will use your hard disk. The easiest way to do that is to list the features of both file systems.

Comparison between NTFS and FAT

NTFS
FAT 16/32
  • Default File system In Windows XP, 2k and NT
  • Support For Drives over 40gb, Files over GB
  • Allows extended file names, foreign characters
  • Has a severely crippled maintenance system in chkdsk
  • Chkdsk is notoriously slow
  • Increased security with file encryption
  • Smaller file clusters, 4kb
  • Compression to reduce disk space
  • User permissions for files and folders
  • File copies are “undone” if interrupted, cluster chains is cleaned
  • Small files are kept in Master File Table at the beginning of the drive
  • Not compatible with different operating systems on the same computer
  • Fat 16 not compatible with XP, FAT is more compatible with other operating Systems( Windows 95, etc)
  • FAT 16 has 8.3 character limitation
  • Has better, more and interactive recovery utilities (scandisk)
  • Scandisk is very quick
  • Just a space for the OS to read files
  • Faster on drives less than 10gb
  • FAT 16 cluster size is 32kb
  • Cluster chains containing data from interrupted copies are marked as damaged
  • Master File Table are separate from files

Some Random Facts

  • Fat 16 was developed in 1981 for dos
  • Fat 16 was designed to handle floppies
  • Fat 32 is an extension of Fat 16
  • Fat 32 introduced in service pack 2 of Windows 95
  • Operating systems may recognise Fat16, but not Fat 32 (Win NT)
  • You can go from FAT to NTFS but not the other way around
  • FAT = File Allocation Table
  • NTFS = New Technology File System

Well, Which One Should I Choose?

If you really only want to choose one way or another, here are two very important considerations:
  • For files above 4gb, and hard disks above 32gb, go for NTFS
  • For smaller drives, files and better recovery tools go for FAT
  • But why not go for both, which is the best option in my opinion.
  • Set aside some FAT so that you can run recovery tools, especially scandisk, so that you have something usable when things go awry, instead of the awful Windows System Tools.
  • Then set the rest to NTFS so that you have better security on personal files, support for large files and drive.

More Detailed Comparison

Criteria
NTFS5
NTFS
FAT32
FAT16
Operating System
Windows 2000
Windows XP
Windows NT
Windows 2000
Windows XP
Windows 98
Windows ME
Windows 2000
Windows XP
DOS
All versions of
Microsoft Windows

Limitations
Max Volume Size
2TB
2TB
2TB
2GB
Max Files on Volume
Nearly Unlimited
Nearly Unlimited
Nearly Unlimited
~65000
Max File Size
Limit Only by
Volume Size
Limit Only by
Volume Size
4GB
2GB
Max Clusters Number
Nearly Unlimited
Nearly Unlimited
268435456
65535
Max File Name Length
Up to 255
Up to 255
Up to 255
Standard - 8.3
Extended - up to 255

File System Features
Unicode File Names
Unicode Character Set
System Character Set
System Records Mirror
MFT Mirror File
MFT Mirror File
Second Copy of  FAT
Second Copy of  FAT
Boot Sector Location
First and Last Sectors
First Sector
First Sector
File Attributes
Standard and Custom
Standard and Custom
Standard Set
Standard Set
Alternate Streams
Yes
Yes
No
No
Compression
Yes
Yes
No
No
Encryption
Yes
No
No
No
Object Permissions
Yes
Yes
No
No
Disk Quotas
Yes
No
No
No
Sparse Files
Yes
No
No
No
Reparse Points
Yes
No
No
No
Volume Mount Points
Yes
No
No
No

Overall Performance
Built-In Security
Yes
Yes
No
No
Recoverability
Yes
Yes
No
No
Performance
Low on small volumes
High on Large
Low on small volumes
High on Large
High on small volumes
Low on large
Highest on small volumes
Low on large
Disk Space Economy
Max
Max
Average
Minimal on large volumes
Fault Tolerance
Max
Max
Minimal
Average


11/03/2014

How to Install Android Kitkat Version on VMWare work Station

1:- Download VmWare 10 Link Here :-

2:- Vmware 10 Torrent Link Here !


3:- Android Kitkat 4.4 Link Here


How To install Android kitkat os 4.4 on vmware 10 version step by step .


In this particular Blog post we will see what it takes and how to install latest version of Android KitKat on VMWare workstation.
I have given Link for Vmware ann Android Kitkat iso file in above link so please find and download it .

How To Run Android Kitkat on VMware Workstation 2 Select the Custom option that is available and Click Next.How To Run Android Kitkat on VMware Workstation 3  

Select a CPU, 1GB RAM and required amount of Hard Disk.Browse and select the ISO of 

Androisx86How To Run Android Kitkat on VMware Workstation 5 

How To Run Android Kitkat on VMware Workstation 6 

Select a CPU, 1GB RAM and required amount of Hard Disk.

How To Run Android Kitkat on VMware Workstation 8 How To Run Android Kitkat on VMware Workstation 9 How To Run Android Kitkat on VMware Workstation 10 How To Run Android Kitkat on VMware Workstation 11How To Run Android Kitkat on VMware Workstation 12How To Run Android Kitkat on VMware Workstation 13How To Run Android Kitkat on VMware Workstation 14How To Run Android Kitkat on VMware Workstation 15  Once you are finished, Tick on Power on this Virtual machine after Creation box and clickFinish.How To Run Android Kitkat on VMware Workstation 16

Here i have created Virtual machine for Android Kitkat 4.4.Now here i going to install android in this virtual machine step by step .
Select INSTALL. You can also run the live CD. But I prefer to install the OS. If you choose live cd, you don’t need to do anything after this step, except enjoy your android.


Then: Create/Modify partitions <-- Press enter.Choose [ New ] <-- Press enter.then [ Primary ] <-- Press enter.Size (in MB): 1069.29 <-- Press enter.Then:Choose [ Bootable ] <-- Press enter.Choose [ Write ] <-- Press enter.type yes <-- Press enter.

Now the disc is being prepared:


Choose [ Quit ] <-- Press enter.

Now select sda as the install partition:


Choose a file-system. I tried ext2 and ext3. Take whatever you like. Hit on Ext3

Install the GRUB bootloader.


File-system writable? If you want a writable file-system, choose yes.

You are done. Choose Run Android-x86.


Thank You .
Install it and message me for any query.technical.gaurav@gmail.com


Step-by-step samba server configuration on RedHat Enterprise Linux

Step-by-step samba server configuration on Red Hat Enterprise Linux

1.Server  IP address is 192.168.0.254 and machine name is SERVER1.
2.Windows machine IP address is 192.168.0.2 and machine name is client2.
3.Firewall Should be disabled.
 #chkconfig iptables off
 #service iptables stop
 #chkconfig ip6tables off
 #service ip6tables  stop
4.To check if all rpms required for samba are installed or not.
 #rpm –qa | grep samba
 Samba-<version-name>
 Samba-common-<version-name>
 Samba-client-<version- name>
 System-config-samba-<version-name>
5.If not, install it using
 #rpm –ivh samba
6.Copy the original configuration file as smb.conf.bck
 #cp /etc/samba/smb.conf /etc/samba.conf.bck
 (This will keep a backup copy of your configuration file.)
7.Now edit the configuration file
 #vi /etc/samba/smb.conf
8.To share home directory edit this part of /etc/samba/smb.conf
 [homes]
 comment=Home directories
 browseable =no
 writable=yes
9.To share printer edit this part of  /etc/samba/smb.conf
 [printers]
 comment = All printers
 path = /var/spool/samba
 browseable = no
10.To configure share called IHNCSHARE edit this part of /etc/samba/smb.conf
 [IHNC’s share]
 comment = Testing Samba Server
 path  = /samba
 valid users = user1, user2
11.Save the file with wq:
12.To check your configuration file type testparm
 #testparm
13.Create two samba users user1 and user2
 useradd user1
 useradd user2
14.Create smbpassword for both the users
 smbpasswd –a user1
 smbpasswd –a user2
15.Now you stop/start the samba services
 #service smb stop
 #service smb start
16.To see what is shared from your server through samba for a particular user
 #smbclient  -L server1 –U user1  or smbclient –L //192.168.0.1 –U user1
17.To see what is shared for a particular host
 #smbclient –L  mac2
18.Now, permanently make samba server on
 #chkconfig smb on

Accessing Windows Shares from RHEL 6

Now that the Samba resources are configured and the services are running, it is time to access the shared resource from a Windows system. On a suitable Windows system on the same workgroup as the RHEL 6 system, open Windows Explorer and navigate to the Network page. At this point, explorer should search the network and list any systems using the SMB protocol that it finds. The following figure illustrates an RHEL 6 system named rhel6 located using Windows Explorer on a Windows system 

Accessing an RHEL 6 system from a Windows 7 desktop

Double clicking on the RHEL 6 host will prompt for the name and password of a user with access privileges. In this case it is the demo account that we configured using the smbpasswd tool. Entering the username and password will result in the shared resources configured for that user appearing the explorer window, including the tmp resource previously configured:

RHEL 6 shares listed on Windows 7

Double clicking on the tmp shred resource will display a listing of the files and directories contained therein.

Accessing Windows Shares from RHEL 6

As previously mentioned, Samba is a two way street, allowing not only Windows systems to access files and printers hosted on an RHEL 6 system, but also allowing the RHEL system to access shared resources on Windows systems. This is achieved using the samba-client package which is installed by default under most RHEL 6 configurations. If it is not currently installed, install it from a Terminal window as follows:
su –
yum install samba-client 
To access any shared resources on a Windows system, begin by selecting the Places -> Network desktop menu option. This will display the Network browser dialog including an icon for theWindows Network (if one is detected) as illustrated in the following figure:

Image:rhel6_windows_network_in_nautilus.jpg

To obtain a list of Windows workgroups on the network, double click on the Windows Network icon. From within the list of workgroups double click on the desired group to obtain a listing of servers available for access:
Image:rhel6_samba_windows_resources.jpg
Finally, double clicking on a computer will list the shared resources available for access from the RHEL client.

Summary

In this chapter we have looked at the steps necessary to configure an RHEL 6 system to act as both a Samba client and server allowing the sharing of resources with other systems on a Windows based network. In the case of Samba server configuration in particular we have only scratched the surface of the configuration options available. A full over of Samba would require an entire book. Many such publications and online resources are available if you would like to learn more. Another good place to start is to type man samba in a terminal window.