Touch with us for Information Technology Solutions. Email us for your Query on Technical.gaurav@gmail.com.
Propellerads

20/02/2017

How Make HikVision DVR & CCTV Camera Online !

computer service center panipatHi Friends !

Welcome to IT Bull Experts.


>>>>>>>>>>>>>>>>>>>>>>>>>>>><<<<<<<<<<<<<<<<<<<<<<<<


Today we are going to Setup  HikVision DVR & CCTV Camera Online.


data recovery panipat


Steps : -


1:-  First :- Connect your DVR with Patch Cable or Lan Cable to your home router with internet.


2:- Please confirm that blue light is blinking their ! this is showing that you are connected to internet.

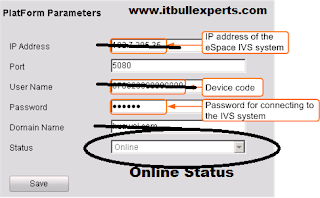
3:- Enter the IP Address of DVR :- Login in it > Configuration > Network > Advance setting > Platform Access.

4:- See their Plat Form  Status ? If it is showing ONLINE  then go Step 6 other wise go recheck your internet setting or network configuration.

5:- 
computer service panipat
Platform Access status 

6:-  Now open go to internet explorer type their :- http://www.hik-connect.com/ website.


computer repair panipat


7:- Login their >  Click on Device Management > 


cctv camera panipat

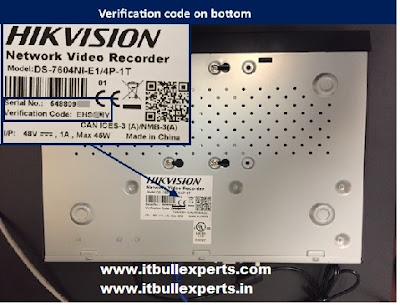
8:- Type their serial number > click add > Re Enter serial number > Click Search > Enter verification code written below your dvr serial number sticker .


cctv camera karnal
That's all we have completed for making dvr online .


>>>>>>>>>>>>>>>>>>>>>>>>>>>>>>>>>>>>>>>>>>>>>>>>

Now here we see how to connect Client to view cctv camera on line.

(A)

1:- Go to website www.ezvizlife.com > Click Login > Enter your Email id and password > Click Download Plug-In > Restart Internet Explorer > now reopen this website www.ezvizlife.com  > Login and here you see all CCTV Camera their .

Above process is through internet explorer 


>>>>>>>>>>>>>>>>>>>>>>>>>>>>>>>>>>>>>>>>>>>>>>>
(B)

2:- Go on   www.hik-connect.com > login > device management > see IP Address > click on that > enter your register email id & Password .

Now here also you can see your Camera .


>>>>>>>>>>>>>>>>>>>>>>>>>>>>>>>>>>>>>>>>>>>>>>>
(C)

Now if we want to see our all camera through our smart phone's then follow these steps.

1:- Go to play store > search IVMS-4500 or Hik-Connect > Click Cloud P2P > User Name and Password which you have created while registering on  www.hik-connect.com .

Sames As it is on Hik-Connect App in android.


2:- Please Do same in Apple smart phone .


Thank you 
Looking Forward 

Gaurav Singhal 
www.itbullexperts.com
www.itbullexperts.in
8570008268


19/02/2017

Error (USB 3.0 Driver Not Supported )! While installing Win 7 64 Bit & 32 Bit in Latest laptop and Desktop .


Hi Friends!
Welcome to I.T Bull Experts (A complete IT Solutions).
Gaurav Singhal.

Official Website :- www.itbullexperts.com
Blog For I.T Solutions :-www.itbullexperts.in


Ø  These Days Intel 5th Gen, 6th Gen, 7th Gen Series doesn't support 3.0 and 2.0 drivers while installing windows 7 even (Installing through USB Bootable Pen drive & Installing through DVD etc). 


Ø  It may drop Keyboard and mouse while installing through DVD.
It may not support USB Bootable Pen Drive while installing from     Pen drive.

What we have to do Fix this Problem:-


Download Win7USB 3.0 CreatorUtility.
 Windows 7* USB 3.0 Creator Utility
   
  
1:- Please download Win 7 * USB 3.0 Creator Utility. (Download) ( Please install this in windows 8 and windows 10 (I think it will not work in win 7 )).

2:- Extract It to Drive C:\temporary (Create a temporary folder in c drive/ Extract all files their without any new folder )

3:- Double Click on Installer_Creator.exe executable file inside that folder with Administrator Rights.

4:-Plug you USB Win 7 Boot Able Pen drive to your system port.

5:- Make sure you have Free Space around 10 GB in C:\ Drive.

6:-   Now we had setup everything here lets go on Installer_ Creator.exe software which we had open in 3rd step.

7:- Now browse it to your root drive ---->>> ( Your USB Win 7 Boot able Pen drive ).

IT Solutions
Go to your Win 7 Bootable USB  Pen drive. 

8:- Click OK.

9:- Last Step :- Click on Create Image.(Read wordings their like :- mounting and un mounting)

10:- It will take around hardly 30 Mins if you have multi Edition DVD or 15 mins if you single edition DVD.  


Now that's it ! Congratulation you Had edited your Boot able pen drive to install win 7 in latest laptop and desktop.


If you like this post please email me or subscribe this Blog .
Gaurav.Singhal@outlook.in
8570008268
I.T Bull Experts
Official Website :- www.itbullexperts.com
Blog For I.T Solutions :-www.itbullexperts.in